Chapitre 9 : Mannequins et Énigmes Oubliées

Mannequins et Énigmes Oubliées est un chapitre de l'histoire de MiSide.

Synopsis

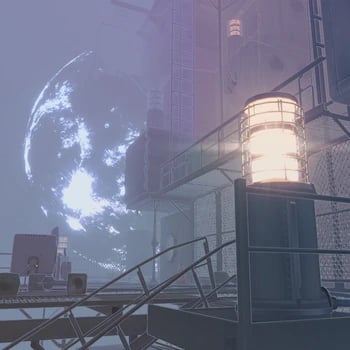
En franchissant la porte, le joueur avancera à travers de nombreuses autres salles qui ressemblent à divers niveaux des Backrooms, tout en étant poursuivi par davantage de modèles Mita corrompus, atteignant finalement une autre porte et y entrant, ce qui le conduit dans un monde ouvert surréaliste et visuellement époustouflant où il peut voir ce qui semble être la lune. Ce monde ressemble à une version très brumeuse de l'espace. Dans ce monde, le joueur doit marcher uniquement sur des passerelles et des rambardes, résolvant des énigmes pour déverrouiller diverses portes métalliques fermées. Après avoir résolu la deuxième énigme et tiré un levier pour déverrouiller une porte, un réfrigérateur tombera du ciel et s'écrasera sur le sol, frôlant de justesse le joueur. En enquêtant davantage, le joueur verra Mita se tenant sur une passerelle au-dessus de lui, qui feindra alors l'innocence et affirmera qu'elle n'avait rien à voir avec le réfrigérateur tombant avant de taquiner le joueur de manière séductrice en lui disant que cette zone est dangereuse et qu'il devrait passer à autre chose.

Alors que le joueur progresse, il entre dans un immense tunnel ressemblant à un vide où de nombreux objets et éléments aléatoires du jeu volent autour de lui. En passant à travers et en atteignant la sortie du tunnel, une chaise volante se coince et se duplique de manière glitchy à plusieurs reprises.

En sortant du tunnel, le joueur atteint une gare où Chibi Mita descend du train et dit impoliment au joueur de bouger avant de s'enfuir. En montant dans le train, le joueur rencontre Mitaphone, le conducteur intégré du train, qui dit au joueur d'utiliser le pistolet monté sur le train pour abattre les monstres volants alors que le train avance. À leur arrivée à destination, Mitaphone fait ses adieux au joueur et celui-ci quitte le train, découvrant une machine d'arcade à laquelle il peut jouer optionnellement. Après avoir trouvé et examiné une photo, le joueur est envoyé dans la chambre de Ghostly Mita.

Progression

1. Faites un tour.
2. Allez à la machine d'arcade.
3. Vérifiez tous les modèles de Mita.
4. Retournez en bas.

Images Récentes

images

Images de Mita

Mita (Crazy Mita) Normal image
Mita (Crazy Mita) Revealed image
mita image
School clothes.
School clothes.
Vampire costume.
Vampire costume.
Festive Santa dress.
A photo of Mita dancing.
A photo of Mita sitting down and looking over her shoulder.
A photo of Mita hugging the Player from behind.
A photo of Mita with a white bikini and a sly smile.
A photo of Mita in a red bathing suit looking over the water.
A photo of Mita holding up the peace sign while out in nature.
A photo of Mita out in nature.
A photo of Mita playing with a cat.
Mita Room
Mita Room
Mita’s legs stuck inside of the wall.
Mita’s primary outfit.
Mita’s revealed appearance.
Mita’s School Uniform (Blue).
Mita’s School Uniform (Black).
Mita’s School Uniform (White and Blue).
Mita’s vampire outfit.
Mita’s Santa outfit.
Kind Mita Normal image
mita image
mita image
mita image
Cool Mita (Cappie) Normal image
mita image
mita image
mita image
mita image
mita image
mita image
mita image
mita image
mita image
mita image
mita image
Tiny Mita (Broken Mita) Normal image
Picture of Mini Mita before she got her injuries.
mita image
mita image
mita image
mita image
mita image
Mini Mita and a large Glitch Beast chasing the player.
Short Haired Mita Normal image
Photo of Short-Haired Mita taking a selfie in the mirror looking kind of sleepy.
Photo of Short-Haired Mita looking confused at the camera man.
Photo of Short-Haired Mita loooking concernet at the camera with her arms crossed.
Drawing of Short-Haired Mita relaxing while sitting.
Drawing of Short-Haired Mita looking back over her shoulder.
Ghostly Mita Normal image
mita image
mita image
Sleepy Mita Normal image
mita image
mita image
mita image
mita image
mita image
mita image
mita image
mita image
mita image
2D Mita Normal image
Meditation CG.
Meditation CG.
Tic-tact-toe CG.
Tic-tact-toe CG.
Ring CG.
Ring CG.
Icon.
Icon.
2D Mita
2D Mita
Showing the ring.
Showing the ring.
Happy.
Happy.
Unhappy.
Unhappy.
Scared
Scared
Sad.
Sad.
Mila Normal image
Mila Normal image
mita image
mita image
mita image
mita image
mita image
mita image
mita image
mita image
mita image
mita image
mita image
mita image
Creepy Mita (Ugly Mita) Normal image
mita image
mita image
Core Mita Normal image
mita image
mita image
Chibi Mita Normal image
mita image
mita image
Dummy Mita Normal image
Dummy Mita Revealed image
mita image
mita image
mita image
Mitaphone Normal image
Braided Hair Mita (Unused Mita) Normal image
Long-legged Mita Normal image
mita image
mita image
mita image
Forgetful Bully Mita Normal image
Giant Mita Normal image
Gian Mita before breaking the corridor.
Giant Mita looking at the player.